


I recently posted the pattern for these crochet pumpkins, and I also made some that alternate between two colors by applying tapestry crochet! The pattern for these is the same; to create the stripes, there are color changes within the round. I would recommend using either two light colors or two dark colors. If you mix a light color with a dark color, you might be able to see the carried yarn through the work.
Crochet these pumpkins
My previous blog post includes the written pattern and video for the solid-colored pumpkins. It also includes information about the yarn, size, etc. If you are a beginner, I would recommend making a solid-colored pumpkin first.

Yarn I Used


- Hobbii Rainbow Cotton 8/6 (100% cotton; 114 yds/ 50 g) in the shade beige for yarn A and apricot for yarn B. I used a 3.5 mm hook and the pumpkin is 4 in wide and 2 in tall.
- Paintbox Cotton Aran (100% cotton; aran weight; 93 yds/ 50 g) in the shade mustard yellow for yarn A. I used ballet pink for yarn B (the one on the left in the second picture) and rosy pink for yarn B (the one on the right in the second picture). I used a 4.5 mm hook and the pumpkins are 5 in wide and 2.5 in tall.
- For all of the pumpkins, I used Hobbii Rainbow Cotton 8/6 in the shade dark brown for the stems. I used the same hook size for the stem as the pumpkin.
Video
There is a short video on my YouTube channel to explain how to change color for these pumpkins:
I have also included a photo tutorial here to explain how to change color.
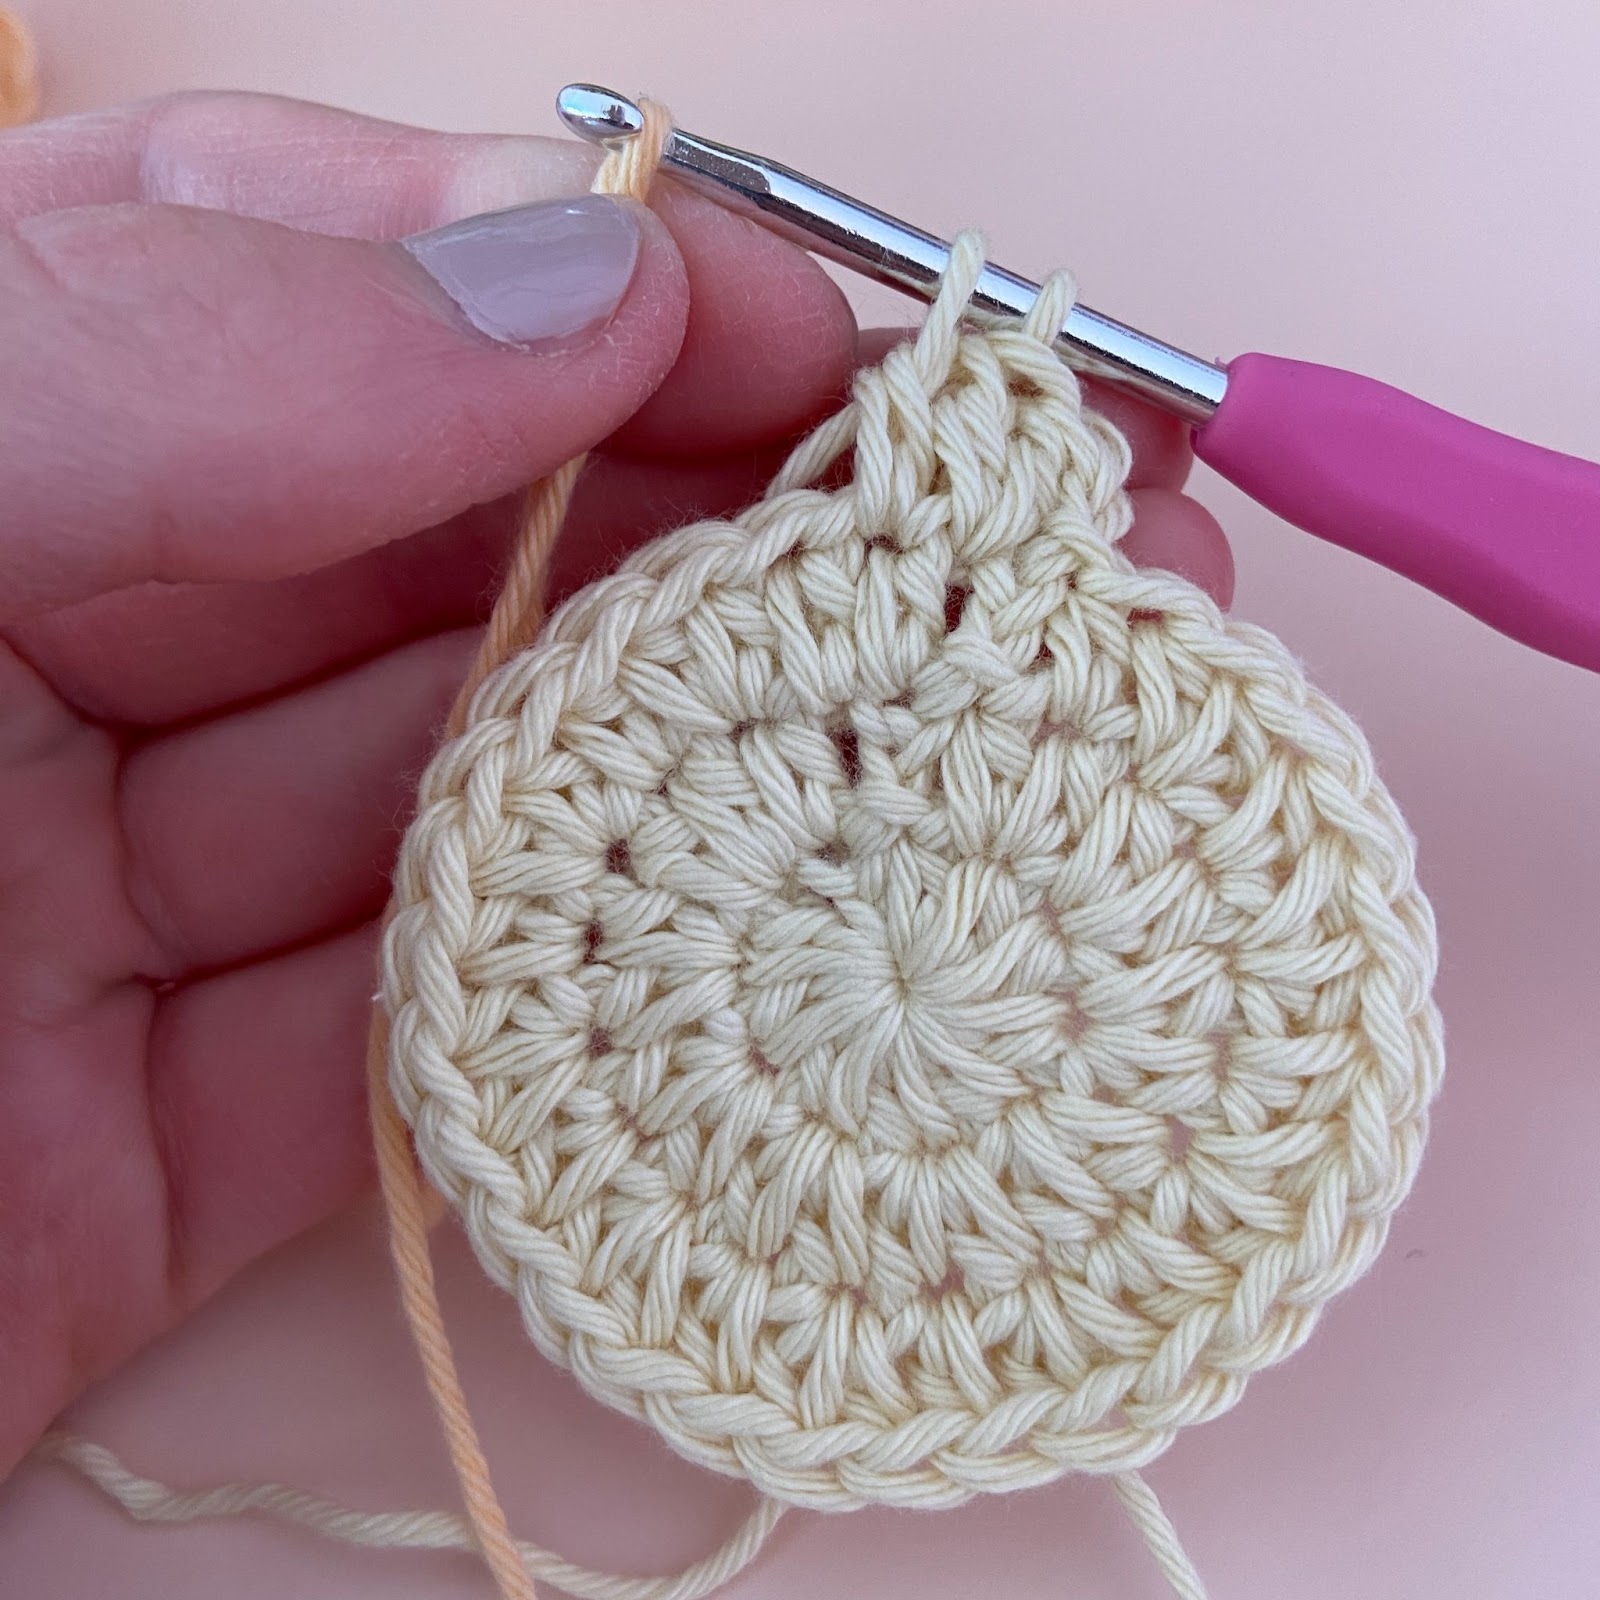
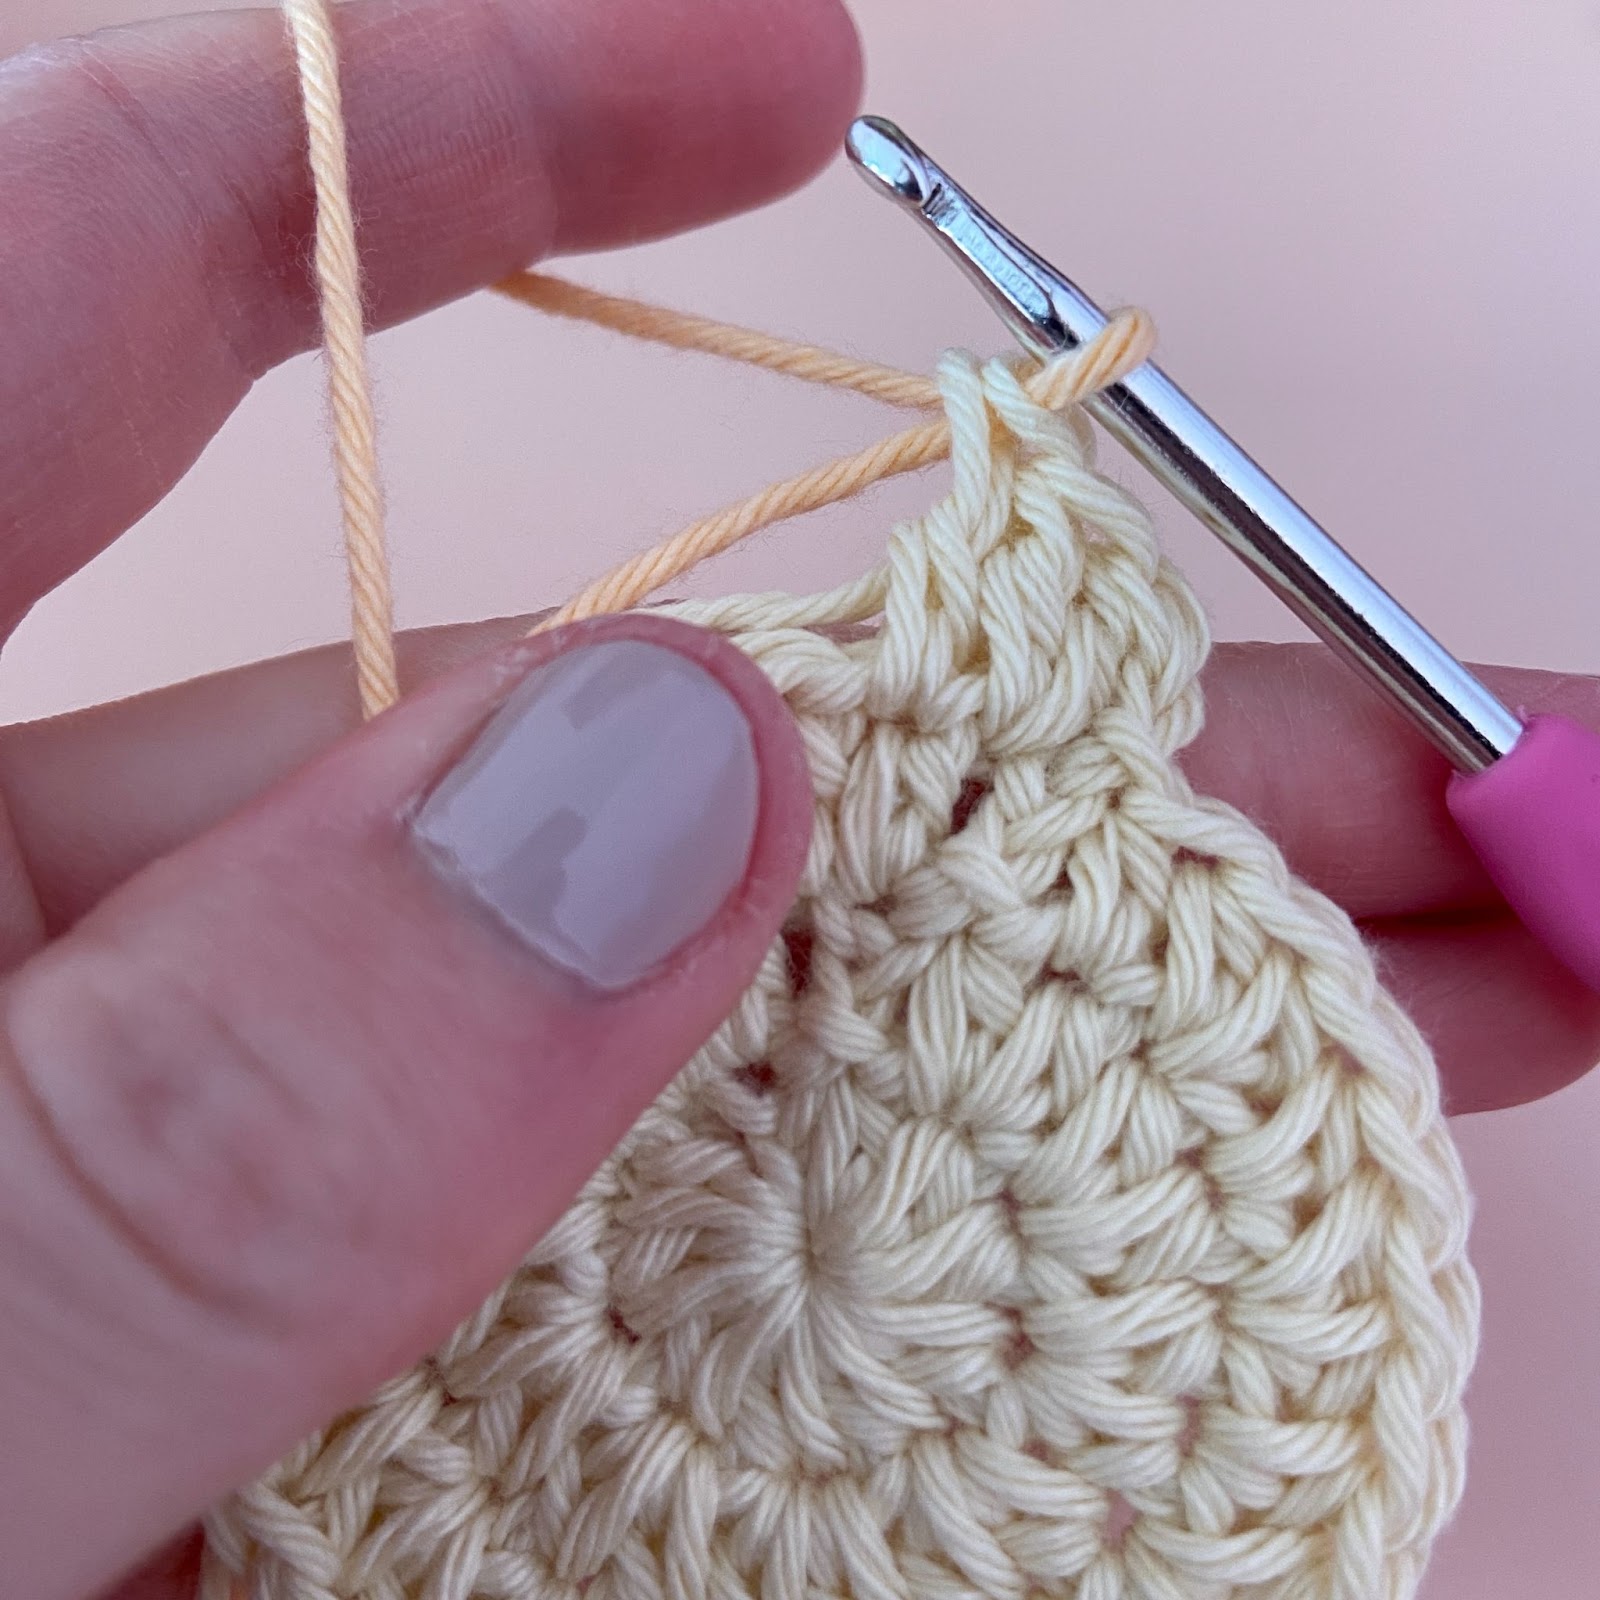
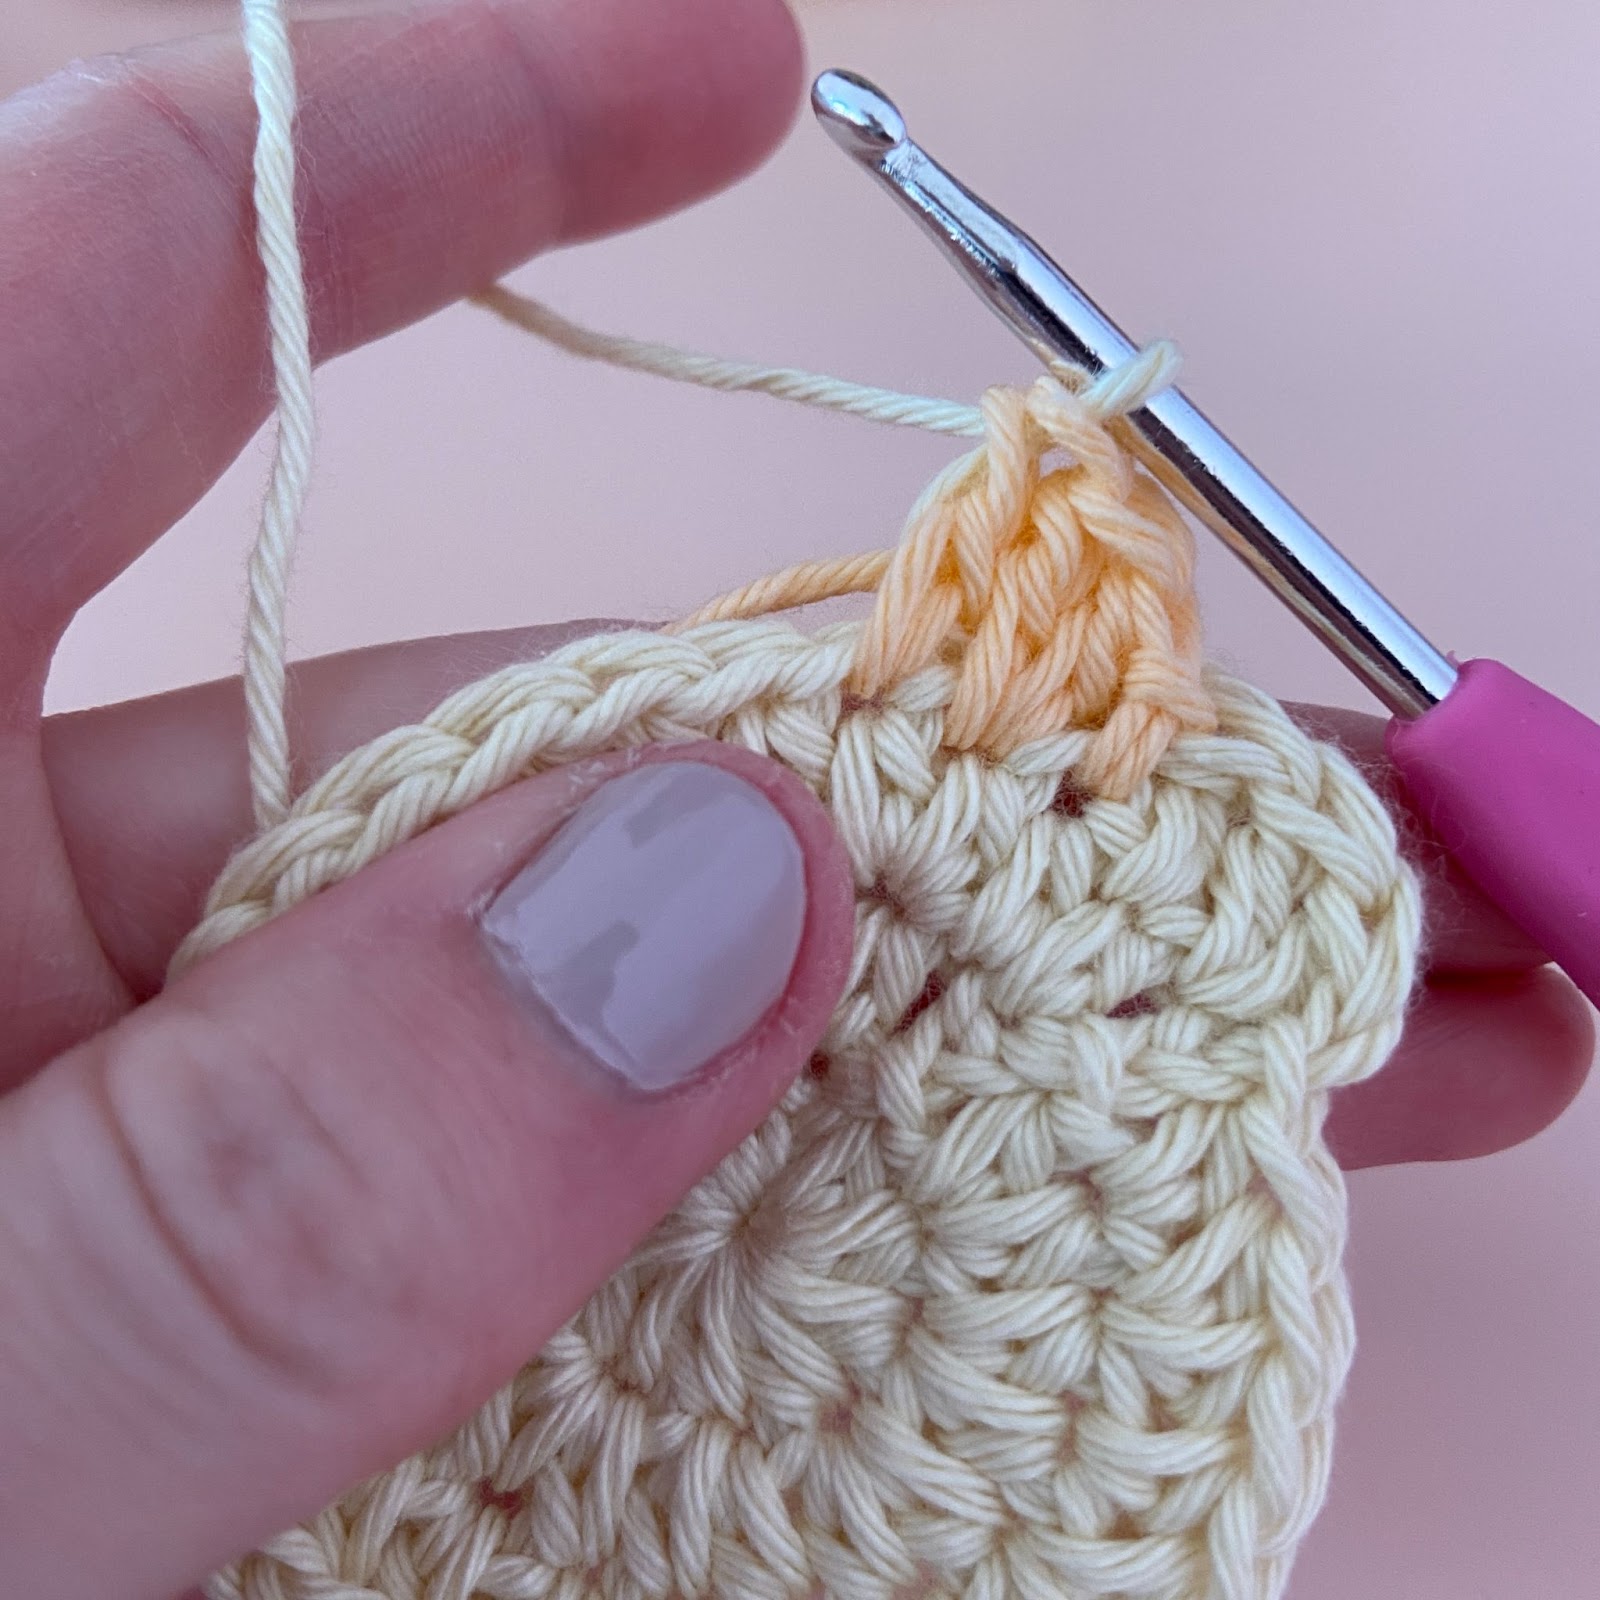
During the stitch before the pattern reads “cc” (change color), use the new color to complete the final yarn over, pull through (pictures 1 and 2).
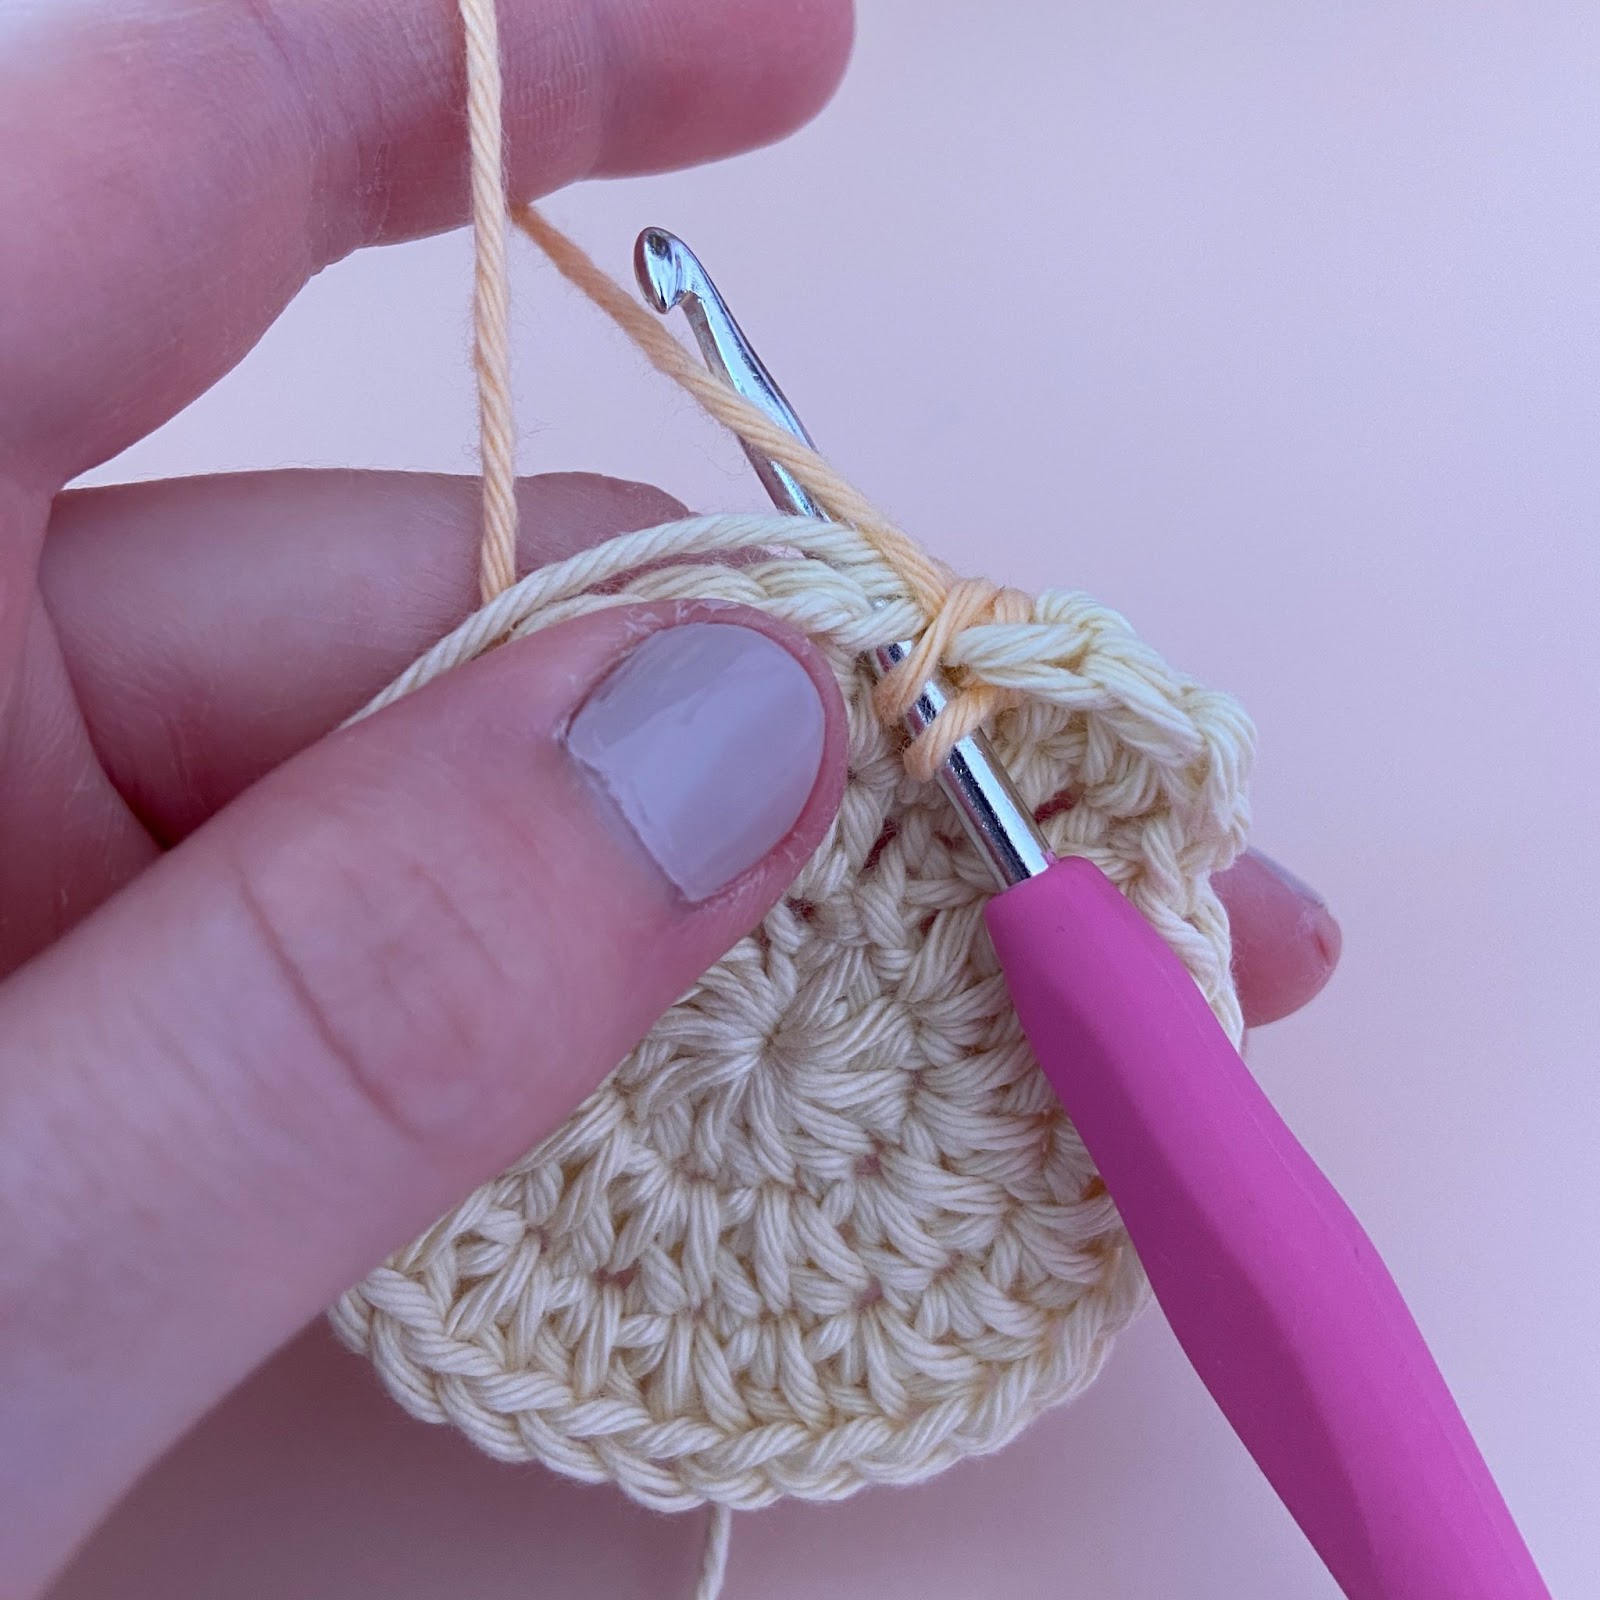
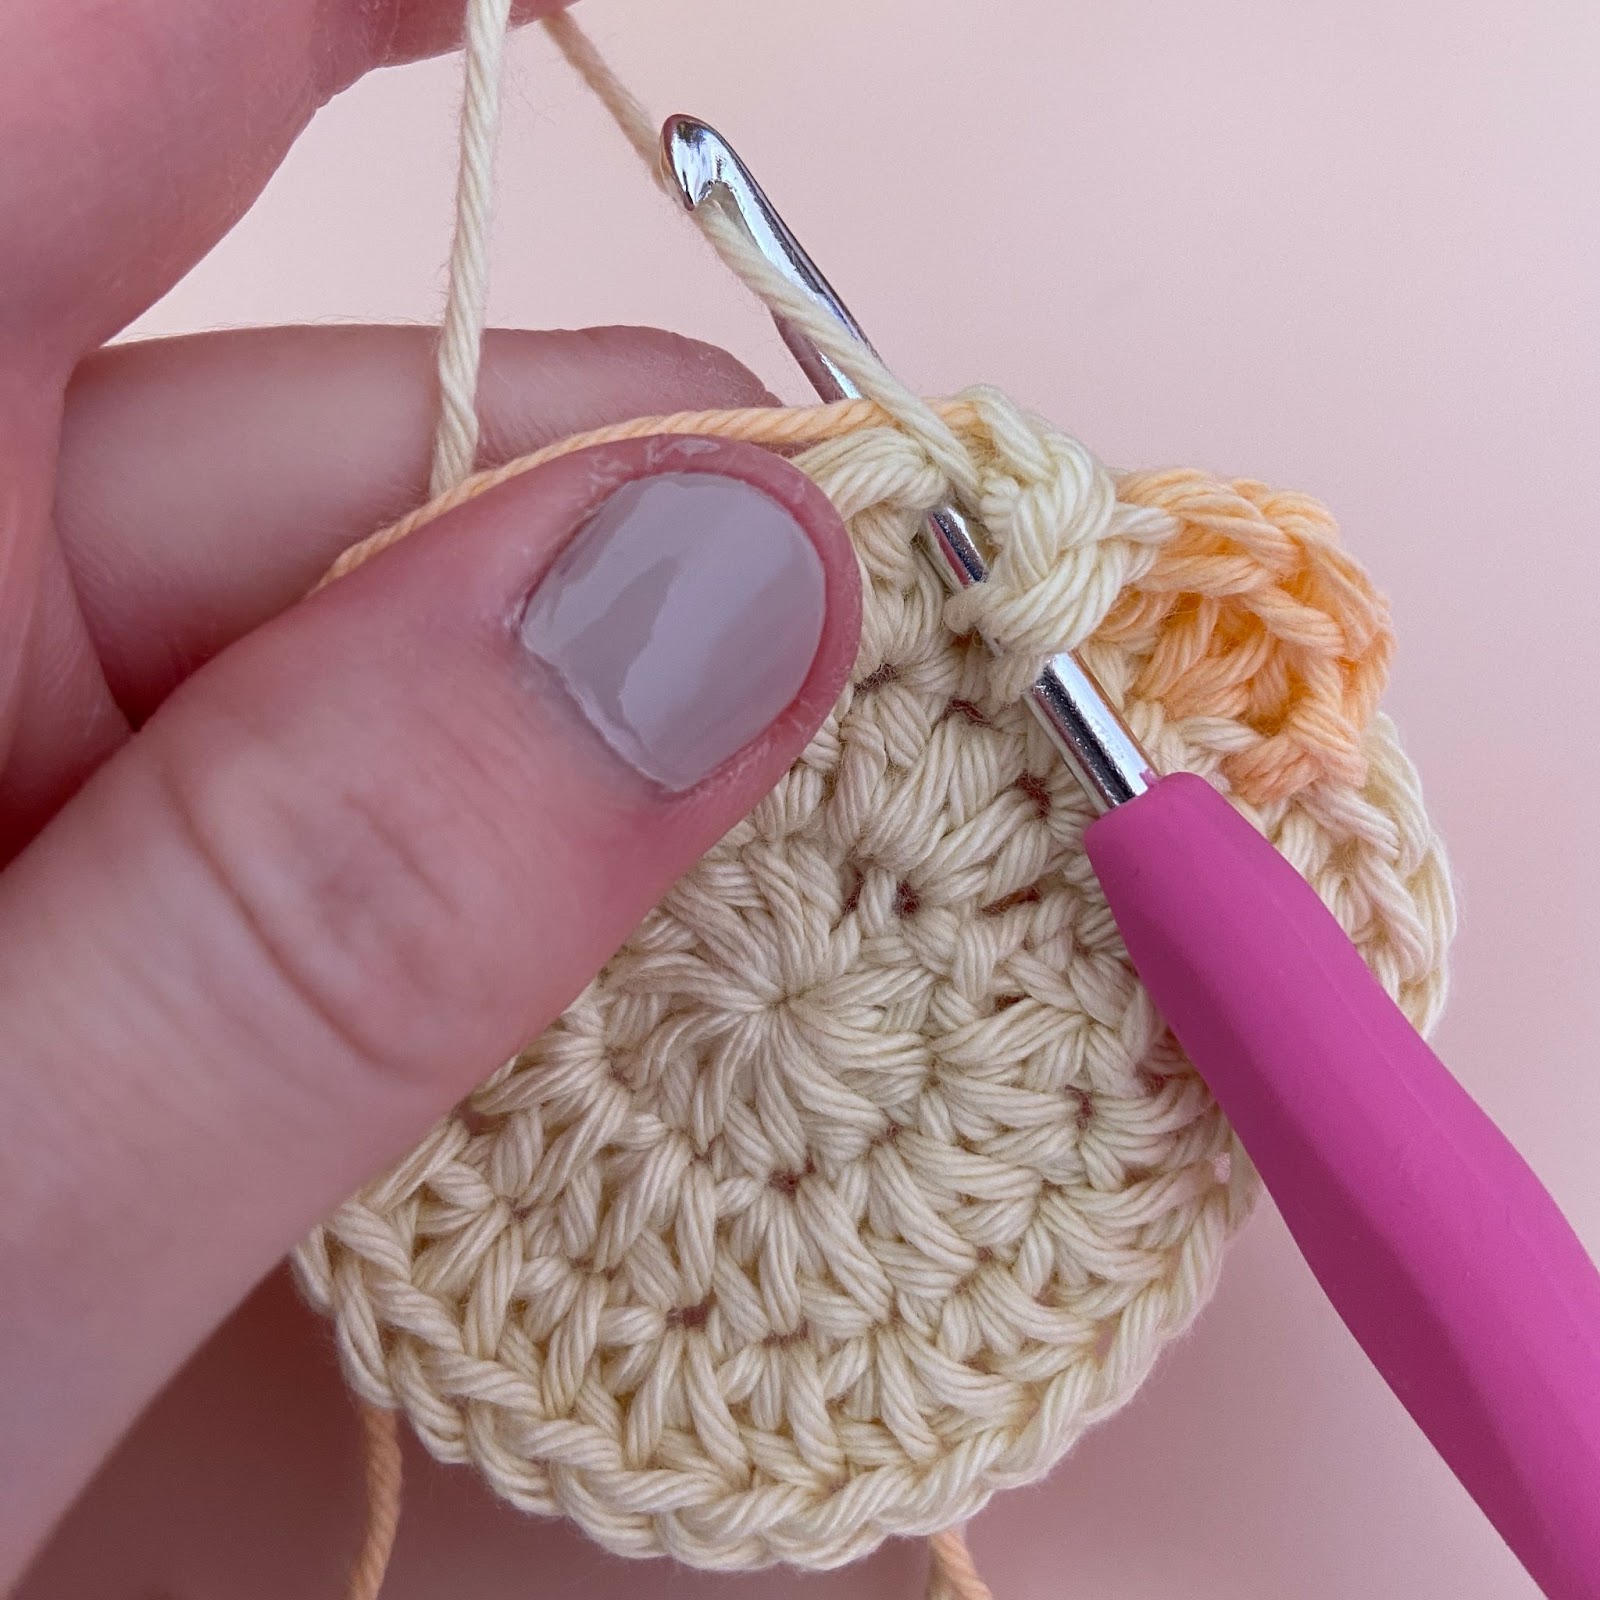
Hold the previous color against the back of the work while crocheting with the new color (picture 3).
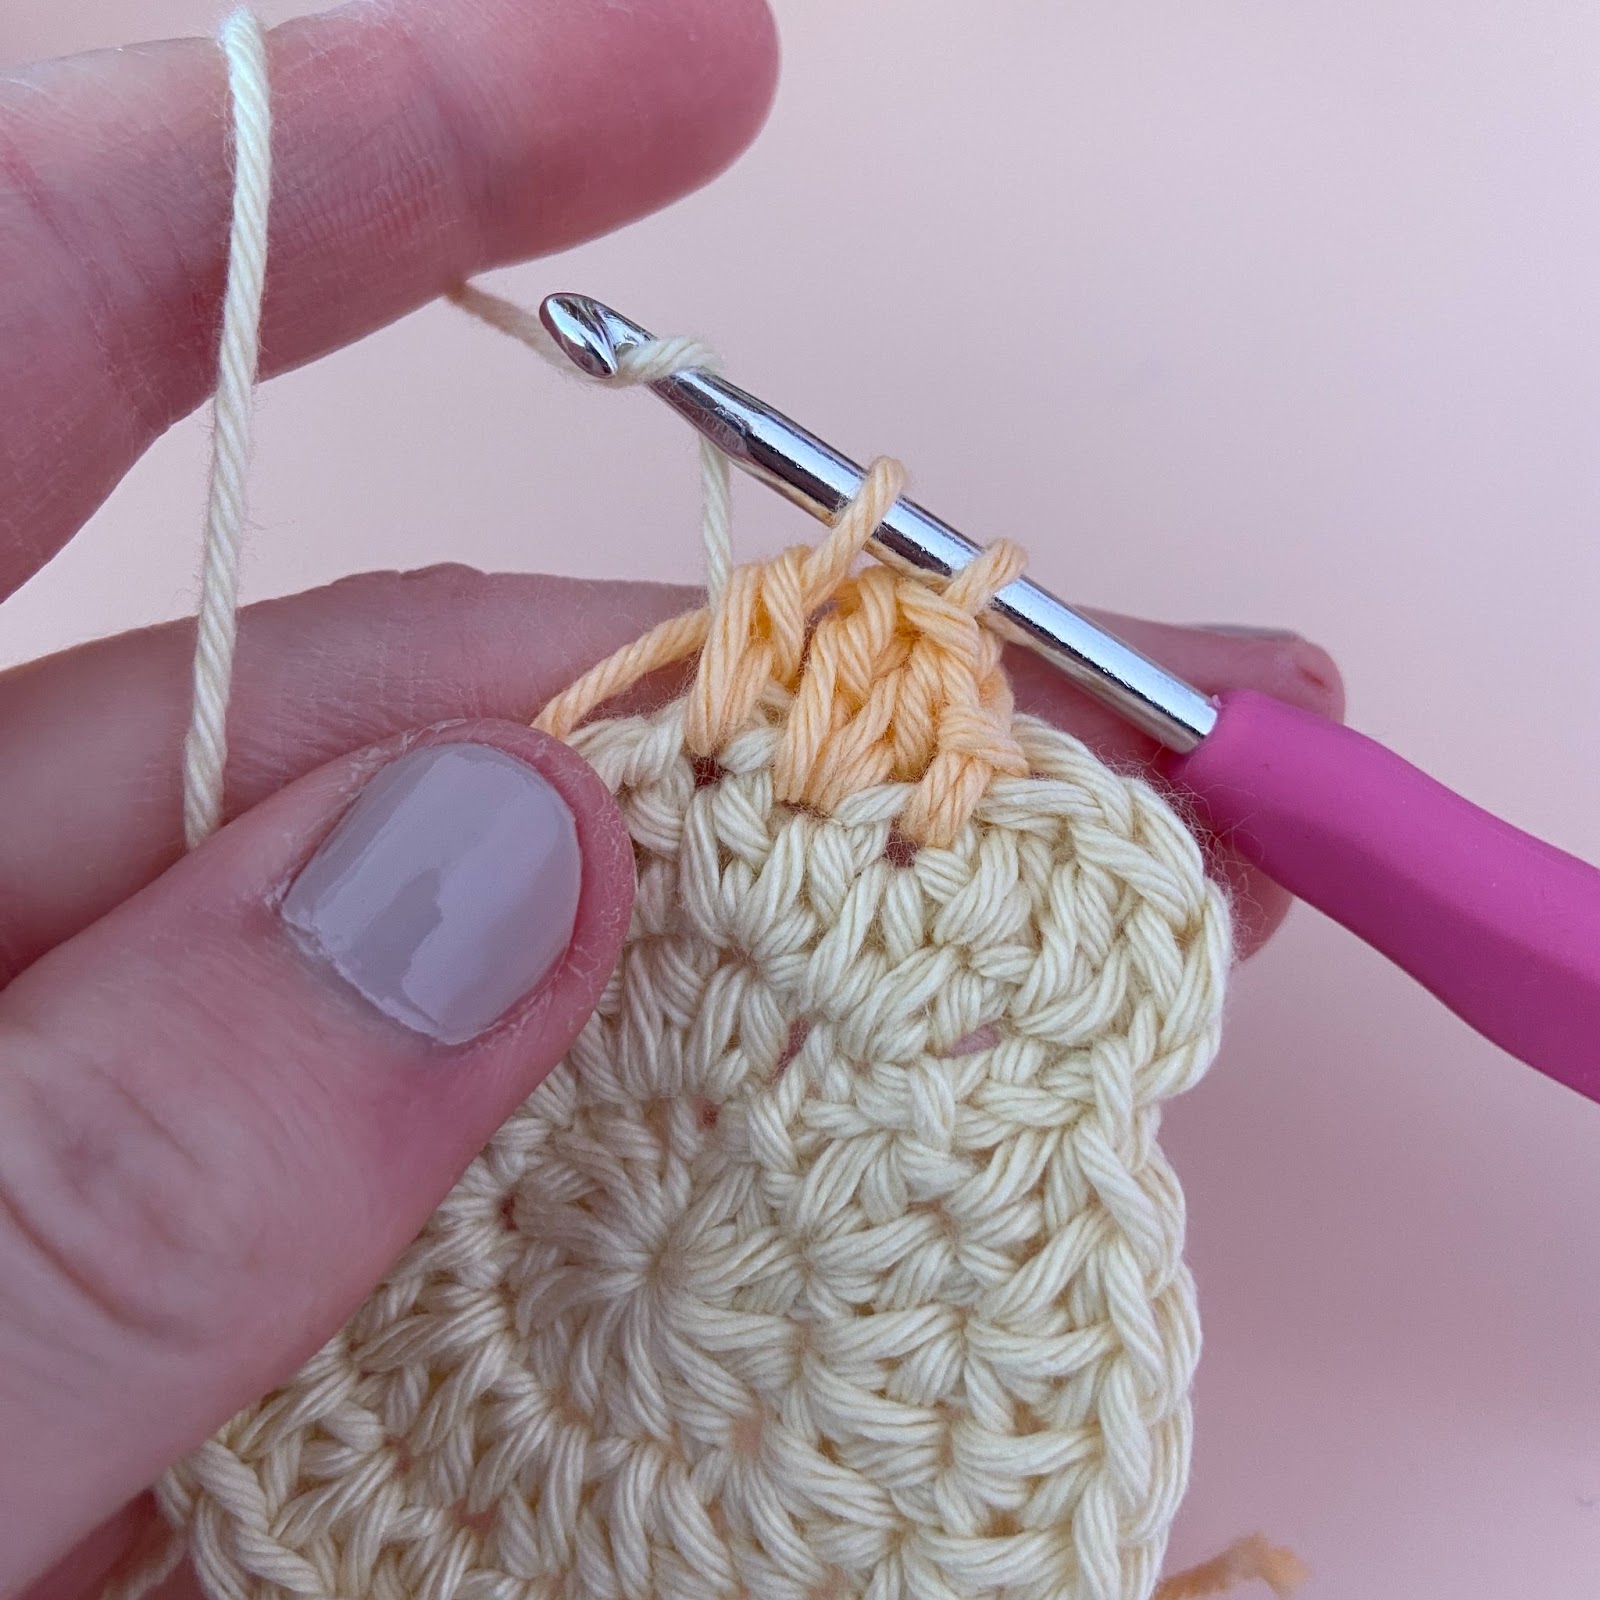
When it is time to change color again, pick up the previous color and follow the same process (pictures 4-6).
Note: At the beginning of the next round, make sure to continue carrying the second color (yarn B). Do not fasten off either of the colors until the pattern states to.
Stitch Abbreviations
In U.S. Terms (Translated to UK in parentheses)
st= stitch
sp= space
ch= chain (chain)
ss= slip stitch (slip stitch)
sc= single crochet (double crochet)
hdc = half double crochet (half treble)
dc= double crochet (treble)
tr= treble (double treble)
sc2tog= decrease 2 single crochet sts together (decrease 2 double crochet sts together)
cc = change color
[ ] indicate that the sts are worked into the same space
{ } indicate that the the sts are repeated later in the pattern
Starting Stitches
At the beginning of a round/row, a ch 2 counts as the first hdc st, a ch 3 counts as the first dc st, and a ch 4 counts as the first tr st (unless stated otherwise).
A ch 1 at the beginning of a round usually does not count as a stitch, so I will note if it should be counted.
The Pattern
When you choose your two colors, one of them will be referred to as “A” in the pattern and the other will be “B”. The color changes begin during round 4. After round 4, when working into a stitch, always use the same color as the stitch.
Foundation: With yarn A, begin with a magic circle.
Round 1: Ch 2 (counts as first hdc throughout), 9 hdc into the magic circle. Close the magic circle. Ss into the top of the ch 2. (10).
Round 2: [Ch 2, hdc]. In each of the following sts of the previous round, [2 hdc]. Then, ss into the top of the ch 2. (20).
Round 3: [Ch 2, hdc], hdc. { [2 hdc], hdc}. Repeat {} til end (8 more times). Then, ss into the top of the ch 2. (30).
Round 4: Ch 1 (counts as first ss), [2 dc], dc. Cc to B. Ss, [2 dc], dc. {Cc to A. Ss, [2 dc], dc. Cc to B. Ss, [2 dc], dc}. Repeat {} til end (3 more times). Then, cc to A, and ss into the ch 1 from the beginning. (40).
Round 5: [Ch 1 (does NOT count as a st), sc], [dc, tr], [tr, dc], sc. Cc to B. Sc, [dc, tr], [tr, dc], sc. {Cc to A. Sc, [dc, tr], [tr, dc], sc. Cc to B. Sc, [dc, tr], [tr, dc], sc}. Repeat {} til end (3 more times). Then, cc to A, and ss into the first sc. (60).
Round 6: [Ch 1 (does NOT count as a st), sc], sc, [dc, tr], [tr, dc], 2 sc. Cc to B. 2 sc, [dc, tr], [tr, dc], 2 sc. {Cc to A. 2 sc, [dc, tr], [tr, dc], 2 sc. Cc to B. 2 sc, [dc, tr], [tr, dc], 2 sc}. Repeat {} til end (3 more times). Then, cc to A, and ss into the first sc. (80).
Round 7: [Ch 1 (does NOT count as a st), sc], 7 sc. Cc to B. 8 sc. {Cc to A. 8 sc. Cc to B. 8 sc}. Repeat {} til end (3 more times). Then, cc to A and ss into the first sc. (80).
Rounds 8 – 11: Same as round 7.
Round 12: Ch 1, then sc into the next st (counts as first sc2tog). 3 sc2tog. Cc to B. 4 sc2tog. {Cc to A. 4 sc2tog. Cc to B. 4 sc2tog}. Repeat {} til end (3 more times). Then, cc to A and ss into the first sc (not the ch 1). (40).
Round 13: Ch 1, then sc into the next st (counts as first sc2tog), sc2tog. Cc to B. 2 sc2tog. {Cc to A. 2 sc2tog. Cc to B. 2 sc2tog}. Repeat {} til end (3 more times). Then, cc to A and ss into the first sc (not the ch 1). (20).
Add a small amount of filling. No need to pack firmly; simply place a small amount inside.
Round 14: Ch 1, then sc into the next st (counts as first sc2tog). Cc to B, sc2tog. {Cc to A, sc2tog. Cc to B, sc2tog}. Repeat {} til end (3 more times). Then, cc to A and ss into the first sc (not the ch 1). Fasten off B (we will just use yarn A for the last round) (10).
Round 15: Ch 1, then sc into the next st (counts as the first sc2tog). 4 sc2tog. Ss into the first sc, and fasten off. (5).
Join the brown into any st of round 15. Ch 7. Skip over the first ch (the one that is the closest to the hook) and sc into each of the following 6 chains. Fasten off and weave in the ends.
I hope you enjoyed this pattern! I would love to see the pumpkins that you make with it, so if you post pictures of them on Instagram, make sure you tag me! You can also email me a picture at maggietrunkhill@daisygirlcrochet.com.

*If you would like to make some of these pumpkins and sell the pumpkins, please give me (Maggie Trunkhill) credit as the pattern designer. Do not reproduce this pattern in any form without my permission.