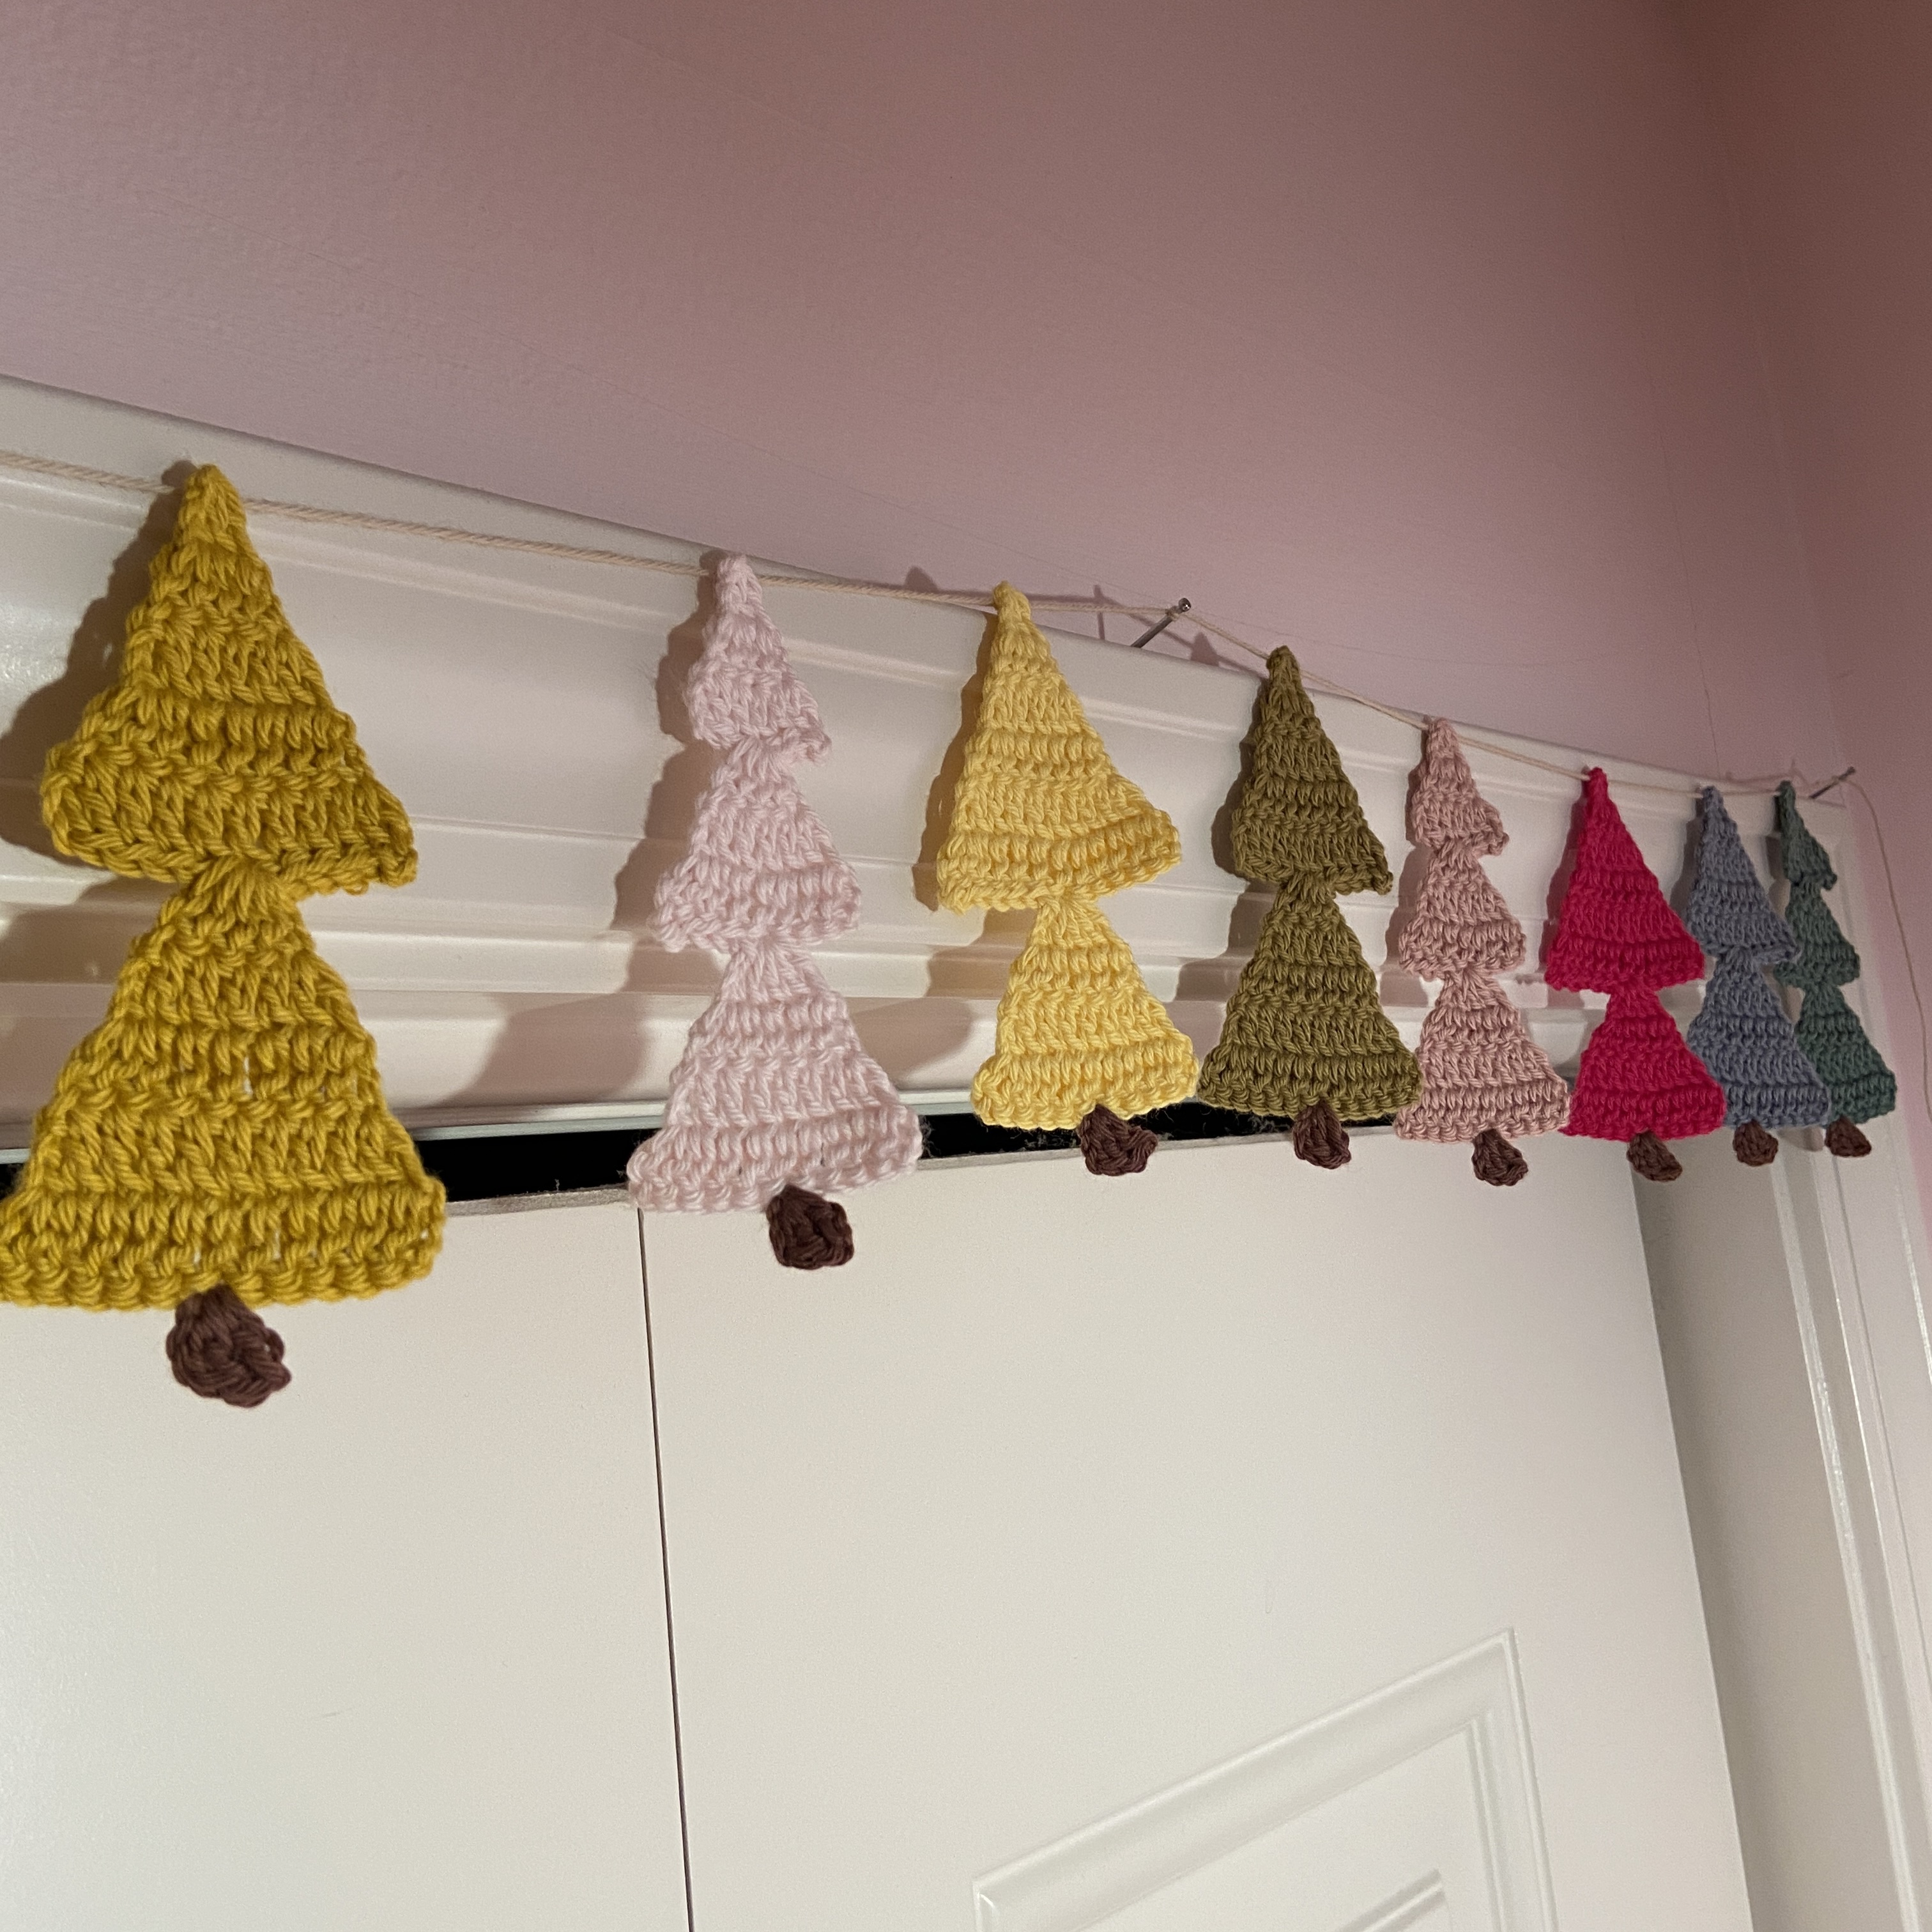


A few years ago, I crocheted a Christmas tree garland after seeing the pastel-colored Christmas trees in the Charlie Brown Christmas cartoon. This year, I wanted to try crocheting some Christmas trees that are composed of multiple triangles! I needed a different name for this garland, so it is called the Christmas Tree Farm Garland. It is a simple, relaxing pattern that you can crochet while watching Christmas movies! I hope you enjoy it and let me know if you have any questions (you can email me at maggietrunkhill@daisygirlcrochet.com). If you crochet some of these Christmas trees, I would love to see them, so if you share a picture of them on Instagram, please use the hashtag #crochetbydaisygirlcrochet and tag me!

The Original Christmas Tree Garland
Materials
3.00 mm crochet hook
Scissors and a tapestry needle- for weaving in ends
Iron
Any sport or dk weight yarn will work well for this project! Each tree requires a very small amount of yarn, so this is a great project to use up little amounts of leftover yarn!
Yarn I Used
Hobbii Rainbow Cotton 8/4 Yarn (100% cotton; 50 g/ 175 yd skeins)
For the trees
- Curry (mustard)
- Pastel pink (light pink)
- Ochre yellow (light yellow)
- Olive (olive)
- Old rose (pink)
- Petunia pink (hot pink)
- Light jeans blue (teal)
- Sage green (sage)
For the stumps: brown
The trees are strung on the beige color.
Size
The trees are about 4 in (10 cm) tall and 1-2 inches (2.5 – 5 cm) wide.
Stitch Abbrevations
In U.S. terms (translated to UK in parentheses)
st = stitch
sp = space
ss = slip stitch (slip stitch)
ch = chain (chain)
dc = double crochet (treble)
[ ] indicate that the sts are worked into the same space
{ } indicate that the the sts are repeated later in the pattern
The Pattern
There are three different trees. I made twenty-four trees (for each of the three trees, make one of every color).
Tree 1
Two tiers with the larger top
With the color of the tree, begin with a magic circle.
Row 1: Ch 3 (counts as the first dc throughout), 2 dc into the magic circle. Close the magic circle. FLIP. (3).
Row 2: [Ch 3, dc], dc, [2 dc]. FLIP. (5).
Row 3: [Ch 3, dc], 3 dc, [2 dc]. FLIP. (7).
Row 4: [Ch 3, dc], 5 dc, [2 dc]. FLIP. (9).
Row 5: [Ch 3, dc], 7 dc, [2 dc]. FLIP. (11).
Row 6: [Ch 3, dc], 9 dc, [2 dc]. FLIP. (13).
Row 7: Ch 1. In each of the following 5 sts, ss. In the next st, [ss, ch 3, 4 dc]. Flip. (5).
Row 8: [Ch 3, dc], 3 dc, [2 dc]. FLIP. (7).
Row 9: [Ch 3, dc], 5 dc, [2 dc]. FLIP. (9).
Row 10: [Ch 3, dc], 7 dc, [2 dc]. Fasten off. (11).
Row 11: Join the brown into the 6th st of row 10. [Ch 3, 2 dc]. Fasten off and weave in the ends.
Tree 2
Two tiers with the smaller top
With the color of the tree, begin with a magic circle.
Row 1: Ch 3 (counts as the first dc throughout), 2 dc into the magic circle. Close the magic circle. FLIP. (3).
Row 2: [Ch 3, dc], dc, [2 dc]. FLIP. (5).
Row 3: [Ch 3, dc], 3 dc, [2 dc]. FLIP. (7).
Row 4: [Ch 3, dc], 5 dc, [2 dc]. FLIP. (9).
Row 5: [Ch 3, dc], 7 dc, [2 dc]. FLIP. (11).
Row 6: Ch 1. In each of the following 4 sts, ss. In the next st, [ss, ch 3, 4 dc]. Flip. (5).
Row 7: [Ch 3, dc], 3 dc, [2 dc]. FLIP. (7).
Row 8: [Ch 3, dc], 5 dc, [2 dc]. FLIP. (9).
Row 9: [Ch 3, dc], 7 dc, [2 dc]. FLIP. (11).
Row 10: [Ch 3, dc], 9 dc, [2 dc]. Fasten off. (13).
Row 11: Join the brown into the 7th st of row 10. [Ch 3, 2 dc]. Fasten off and weave in the ends.
Tree 3
Three tiers
With the color of the tree, begin with a magic circle.
Row 1: Ch 3 (counts as the first dc throughout), 2 dc into the magic circle. Close the magic circle. FLIP. (3).
Row 2: [Ch 3, dc], dc, [2 dc]. FLIP. (5).
Row 3: [Ch 3, dc], 3 dc, [2 dc]. FLIP. (7).
Row 4: Ch 1. In each of the following 2 sts, ss. In the next st, [ss, ch 3, 4 dc]. Flip. (5).
Row 5: [Ch 3, dc], 3 dc, [2 dc]. FLIP. (7).
Row 6: [Ch 3, dc], 5 dc, [2 dc]. FLIP. (9).
Row 7: Ch 1. In each of the following 3 sts, ss. In the next st, [ss, ch 3, 4 dc]. Flip. (5).
Row 8: [Ch 3, dc], 3 dc, [2 dc]. FLIP. (7).
Row 9: [Ch 3, dc], 5 dc, [2 dc]. FLIP. (9).
Row 10: [Ch 3, dc], 7 dc, [2 dc]. Fasten off. (11).
Row 11: Join the brown into the 6th st of row 10. [Ch 3, 2 dc]. Fasten off and weave in the ends.
Assembling the Garland
Blocking
Before the Christmas trees are strung, they are ironed. Place the Christmas trees upside down on an ironing board. Iron only the back sides of the trees. This ensures that the Christmas trees hang nicely on the garland.
The Order
Here is the order I strung the trees in (from left to right):
- tree 1 mustard
- tree 2 light pink
- tree 3 light yellow
- tree 1 olive
- tree 2 pink
- tree 3 hot pink
- tree 1 teal
- tree 2 sage
- tree 3 mustard
- tree 1 light pink
- tree 2 light yellow
- tree 3 olive
- tree 1 pink
- tree 2 hot pink
- tree 3 teal
- tree 1 sage
- tree 2 mustard
- tree 3 light pink
- tree 1 light yellow
- tree 2 olive
- tree 3 pink
- tree 1 hot pink
- tree 2 teal
- tree 3 sage

The Christmas trees are strung on the cream yarn. Cut a piece of the cream yarn to the appropriate length (this will vary based on where you are placing the garland and how many trees you attach to it). Attach a tapestry needle to the end of the cream yarn and string the Christmas trees onto the yarn. Once they are all attached, tie a knot at each end of the garland. This assembling method allows the pieces to move, so you can adjust the length of the garland when you hang it.

Then, the garland is finished! I hope you enjoyed this pattern! If you make it and post it on Instagram, make sure you tag me, so I can see it! You can also email me a picture at maggietrunkhill@daisygirlcrochet.com.
*If you would like to make the garland and sell the garland, please give me (Maggie Trunkhill) credit as the pattern designer. Do not reproduce this pattern in any form without my permission.

